payday loans

Archive for the 'etymology/words' Category

You are currently browsing the archives of Three Star Owl – Functional and Sculptural Clay Artwork with a Natural History .

Twofer Spot the Bird

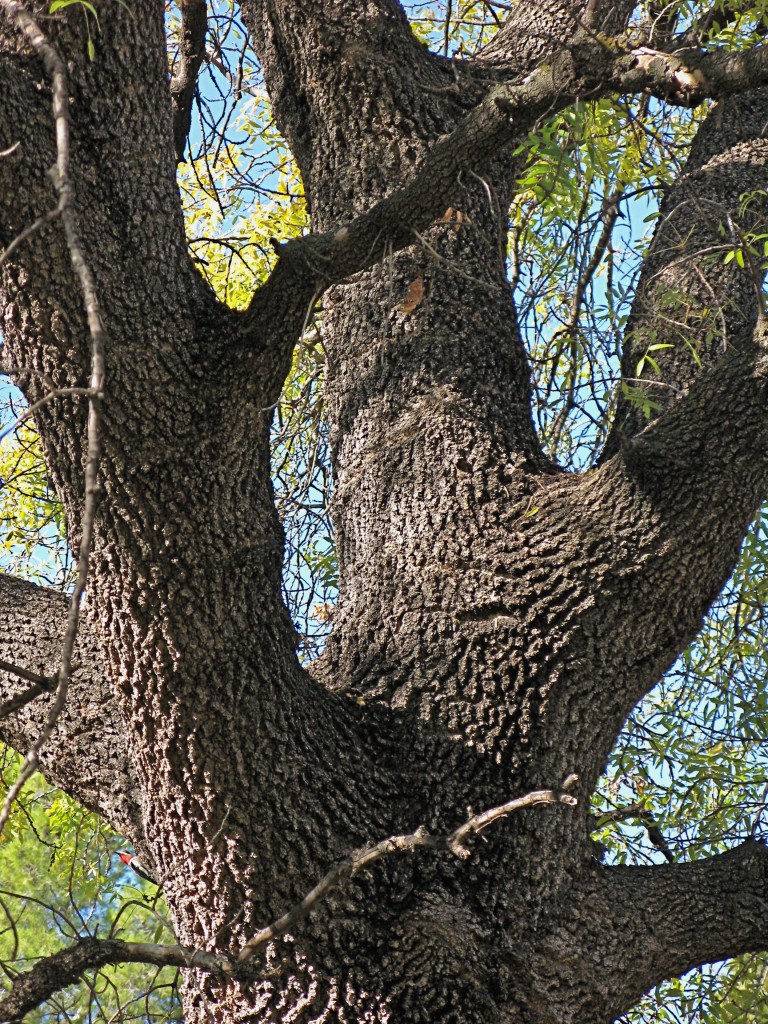
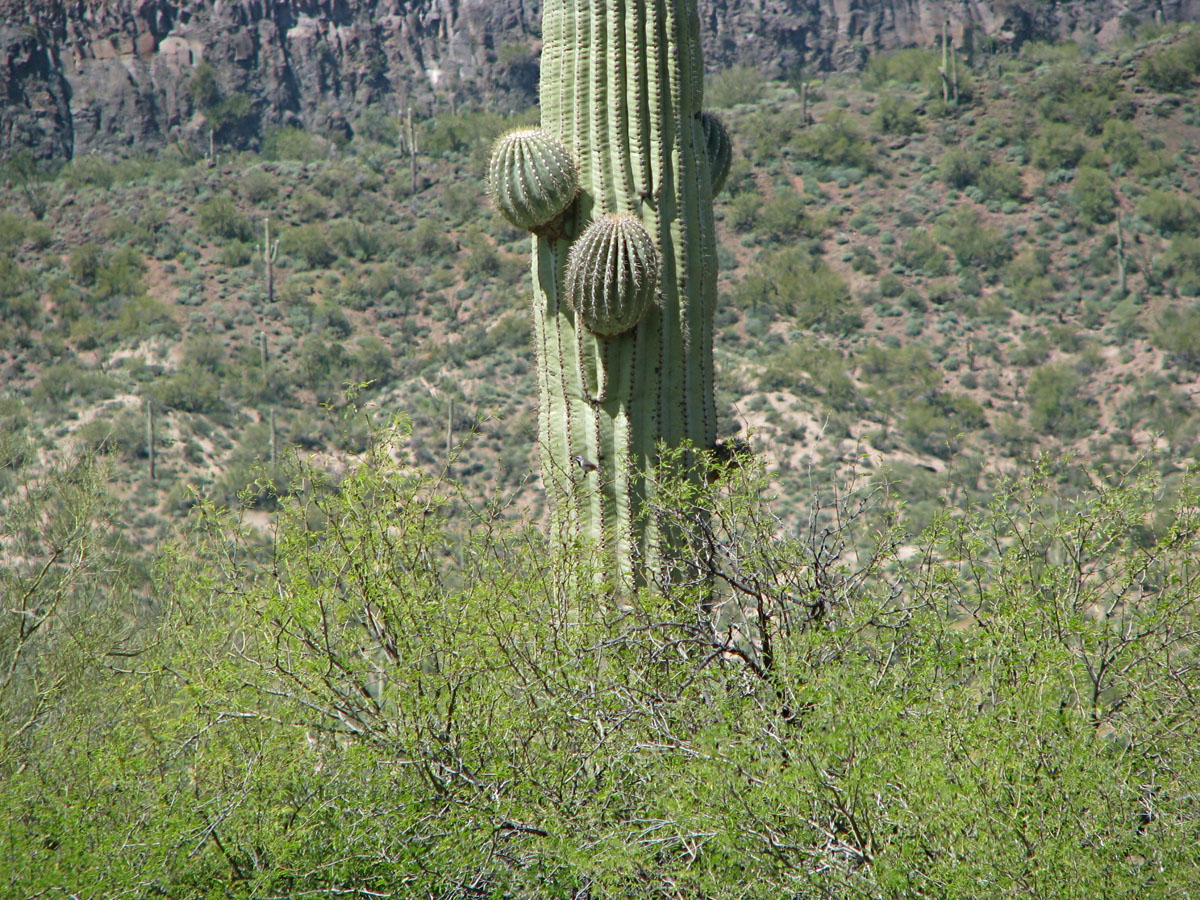
Here are two new Spot the Bird photos.  The visual puzzle is the same in each: huge background, tiny bird.  No camouflage involved, none at all; just hiding against a big landscape.

The first photo of an enormous oaktree (?) in Boyce Thompson Arboretum near Superior Arizona, east of Phoenix, is a photo I took because the branches of this tree were so amazingly massive and lofty.  It was only when I got it home and onto the computer that I noticed there was a bird in the shot, because it had been silent.  Lucky it wasn’t a jaguar, I guess.  By the way, you’re not looking for an intrinsically small bird, just small by comparison to this tree.  (If you find the bird, click twice for a fairly clear embiggening of its image).

I think this second one is easier, especially if you click to enlarge. This photo, ostensibly of a robust saguaro behind a line of newly leafed-out mesquite and the foot of a basalt flow in back, shows a genuinely small bird — a moderately Dinky Dude of the Desert, in fact — doing its singing thing for spring. Hear the jingling sound?

Neither of these will be hard for everyone, especially for folks whose eyes are sharp from being out in the field looking for small things in big, leafy vistas.  I’ll publish enlarged versions of the pictures in a subsequent post.  Extra credit for IDing the birds to species (not that there’s a prize or anything, except kudos to augment your birding kleos.  And, to wax perturbingly didactic, EXTRA extra credit if you know the diff between kudos, Gk κῦδος, and kleos, κλέος).

And if you know what the big tree in the top photo is, please let me know, because I don’t…

Good Luck — I hope you SPOT THE BIRD!

For other Spot the Bird posts, go to the sidebar on the left, and click on the category, spot the bird.

(Top photo, A.Shock; bottom photo, E.Shock)

Posted by Allison on Apr 5th 2010 | Filed in birds,etymology/words,natural history,spot the bird | Comments (3)

Nudging clay horned lizards along

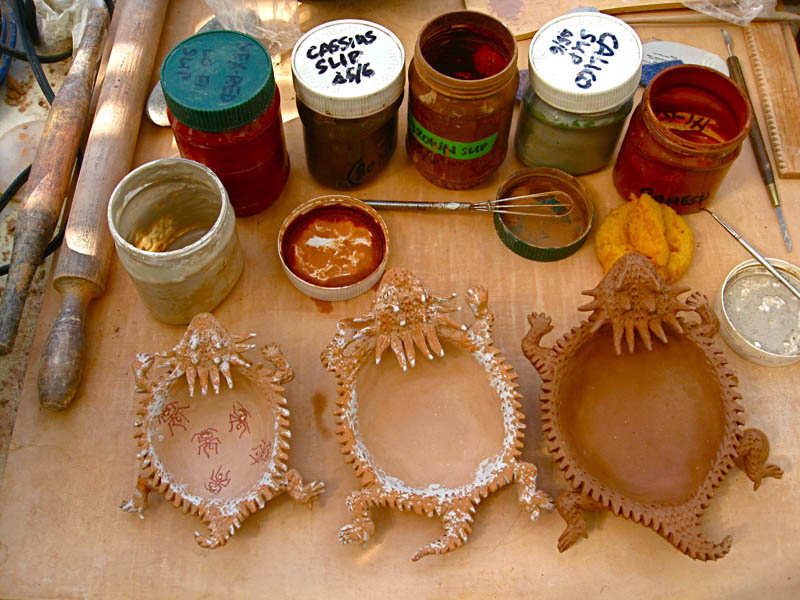
A while back, I posted about my process for making horned lizard bowls (affectionately known as Horny toads) from clay.  Here are the next few steps, all shown in one photo, below.

To the right is a now completely assembled and textured horned lizard, in the leather hard stage, drying.  In the center is a bone dry and partially tinted lizard — note that the clay is now a lighter buff.  I use a sponge and mute slip colors to give the textured skin a mottled appearance, like a horned lizard’s camo-flecked pelt.  (You may remember that slip is a paint-like water and clay mixture with mineral oxides and stains added.)   The colors, which look very contrasty and unnatural at this point, will calm down and become more subtle during firing.  Normally, adding slip is done no later than the leather hard stage to avoid flaking, but the refined slips I use have no problems hanging on.  On the left is a completed horned lizard awaiting its first, or bisque, firing. I’ve added the ants with a very fine brush (a 00 squirrel liner), also in slips.  This is a touchy job: the fine work requires a fairly long process of painting delicate lines — the more ants, the longer the work time — and a lot of handling of a bone dry piece with pointy sticky-outy bits.  If you’ve worked with clay you know that this bone-dry phase (where all the liquid water has evaporated from the clay body) is when a piece is at its most fragile.  On top of that, if something like a horn, a toe or a leg snaps off, it is difficult or even impossible to reattach it trustworthily.  Not that… ahem… that ever happens, or if it did I would admit it… These guys, Regal Horned Lizards, have 10 coronal horns, and so I have to be careful while “anting” them.

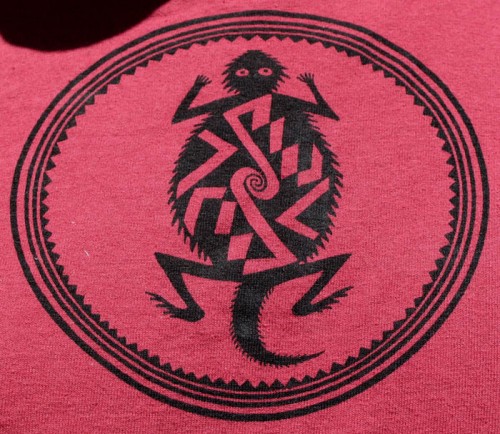
<< A favorite teeshirt of E‘s, a mimbres horned lizard design.  Nice depiction of the lateral spiny scales along its flanks.

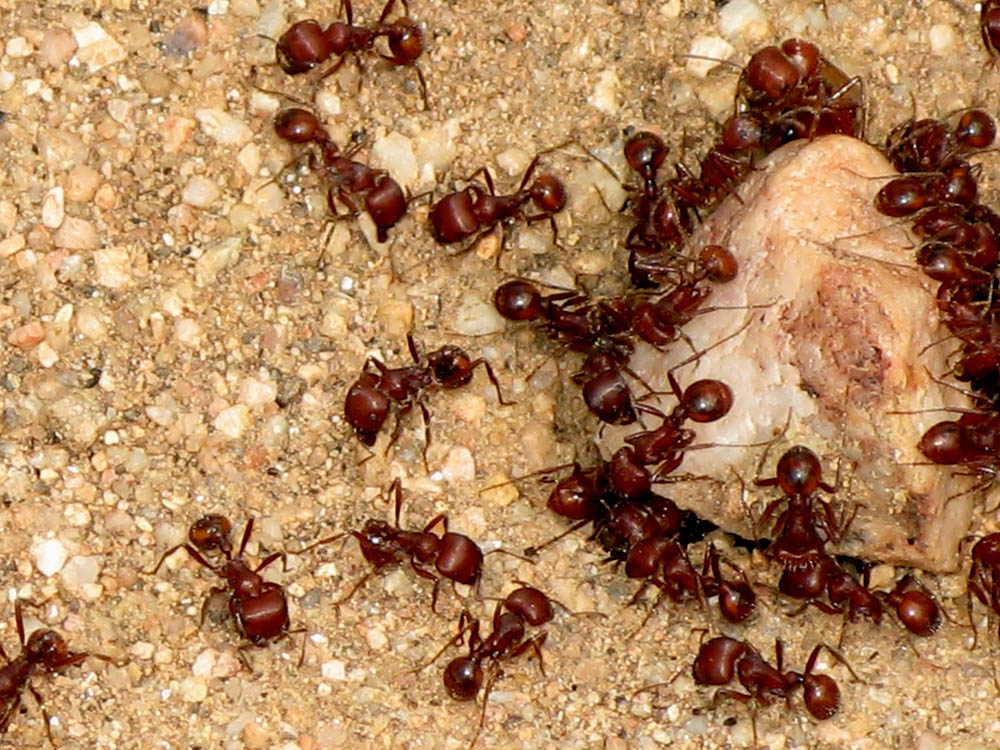
A note on the ants.  They are Pogonomyrmex, a genus of harvester ants, called Pogos for short, understandably.  These are the guys you see issuing forth from their nests, with every seed and scrap of vegetation gleaned clean to the grit for a 5 meter radius around the entrance.  They have a potent and painful bite, but despite that, they are Horned lizards’ most favoritest thing to eat.  It’s tough to capture their essence in a sludgy, opaque medium like clay slip, because they’re waxy like tropical fruit: sort of clear but satiny, too.  I can get close to the effect by depicting them with highlights in white on their red bodies.

Pogonomyrmex ants photographed at Kartchner Caverns State Park (A.Shock)   >>

They’re extraordinary animals: physically very strong, and focused in their social pursuits, with big bolster-like heads (which appear to be larger than their abdomens) sporting impressive grasping mouthparts you would have no trouble seeing with your naked eye, if you got close enough.  Or, you can just click on the photo above — which I call Pogos Agogo — and look at the solitary ant to the lower left.

If you love excellent up-your-nose close-up photos of ants (and who doesn’t?) check out the site of Alex Wild, myrmecologist, or studier of ants.  Better still click here to see his photos of Pogo ants in particular, to get a much better view of the fearsome mouthparts than in my photo above.

Etymological side-bar. In Homer’s Iliad, Achilles’ posse were the Myrmidons. μύρμηξ, myrmex, is ant in Greek.

You can see finished horned lizard bowls in the Three Star Owl Shop.

Got Gila Monster?

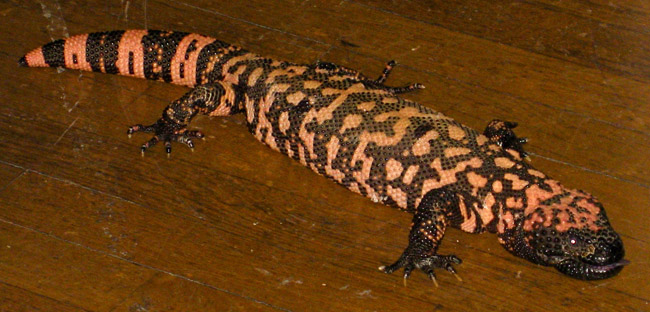
Gila monsters (Heloderma suspectum) are large stumpy lizards with bright handsome markings that are both cryptic and aposematic simultaneously, and whose hands look like neoprene wetsuit gloves with claws.  They are remarkable for being one of only two venomous lizard species in the world.  They live in the Sonoran and southern Great Basin Deserts and love to eat quail eggs, nestling birds and mammals, and other slow-moving prey items. (Below: captive gila monster on a wooden schoolhouse floor, photo A.Shock)captivegimo

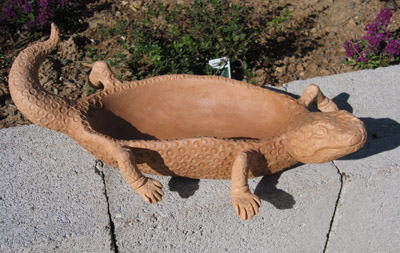
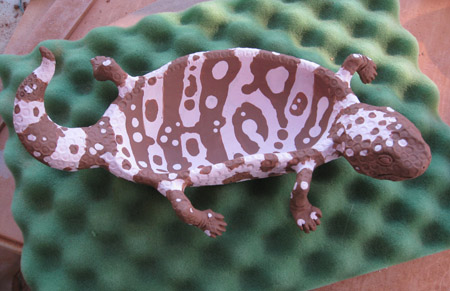
Approximately life-sized clay Gila Monster “bowls” are items I only make one or two of per year or so. They’re quite time-consuming, since they’re textured, slipped, and glazed pretty much beaded lumpGIMOscale by beaded scale.  Here’s one now :

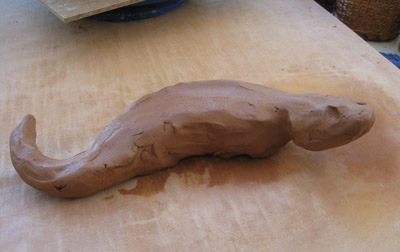
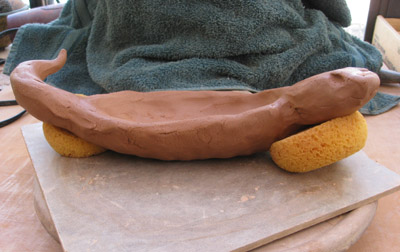
1)  I form a blob of clay that looks like a gila monster.  This early stage is the time to get any sinuousness in the tail, neck and belly, so the clay “remembers” it.  Then it’s time to put the wet lump aside to set up, or stiffen slightly, so that it can be shaped further.  Sponges help hold a pose, if spongeGIMOdesired.  >>

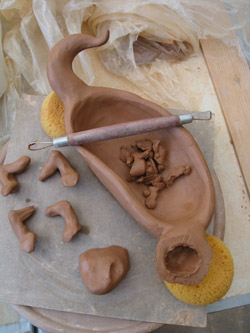
2)  As the water leaves it, the clay becomes more self-supporting.  While waiting for this to happen, I make legs — oddly spindly for such a stout body — with blocked out feet, to stiffen for adding later.  I also hollow out two thick places in the monster body, to aid in drying: the head, and the base of hollowheadGIMOthe tail.  This also makes the completed piece lighter and better balanced.  It is important to make a tiny, invisible passage into the hollow part from the outside, to let air escape during firing, or there could be an explosion.  <<

3)   With the clay slightly stiffer, I smooth the shape into its final form, including carving the toes from the blocked-out “hands”, and rounding the belly “bowl” part.  This shape causes herp boys to giggle, because it makes the lizard look like roadkill to those with scavenging permits for heloderm pelts.  From my point of view, it makes the piece functional, if desired: an Effigy Vessel, and not just a representation.

4)  The next step is to attach the legs, and texture the skin.  This must be done at a particular point of dryness, when the clay is still wet enough to accept the stamps I use to make the “nail-heads” in the skin (Heloderma bonedryGIMOmeans “nail-skin”), but stiff enough to hold up to the handling and pressure of stamping it.  Then it’s waiting for it to be bone-dry for slipping (right).  >>

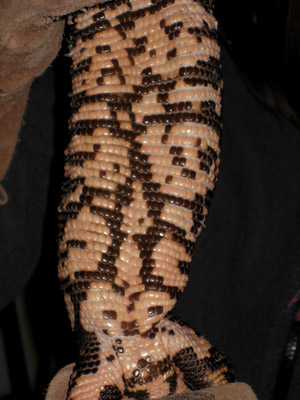
The belly-texture, which looks like pink-and-black Indian corn on the cob, is carved into the clay rather than stamped — this is particularly time-consuming, especially for a part that isn’t seen very frequently.  Early on, I searched the web for a reference photo for Gi-Mo belly-scales, and never found one.  Fortunately, I persuaded a handler at a wildlife education event to flip a live one up for photos (she held it vertically, not upside-down), and got this great shot, which tells me all I need gimobellyto know about what the unders of a monster look like, including vent details (<< left).  You can just see the heavy-duty cowhide welding gloves the handler was wearing; they were covered with black half-moons: venom-marks from previous crabby bites.  <<

5)  Slipping an item bone dry is slightly risky, as adding water to a piece at this point can cause cracking.  But adding slip to a dry surface gives a crisper, less texture-obscuring coating.  I use a combo of commercial under-glazes and slips I make in the studio.  It’s necessary at this point to choose the subspecies:slippedGIMO the banded H.s. cinctum from the northern part of its range, or H.s. suspectum from the southern part, which has a more complicated reticulated pattern.  This one is kind of a combo. >>

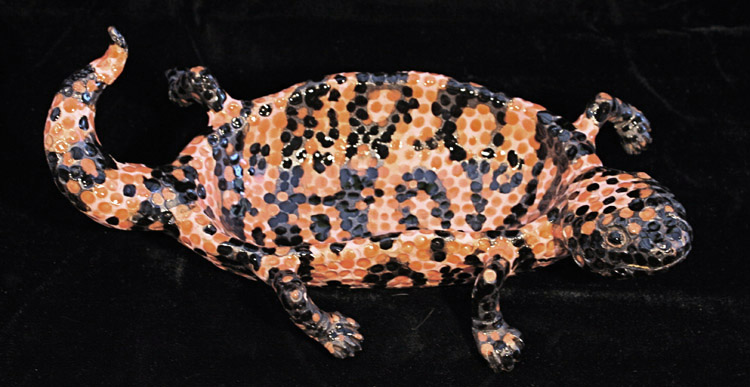
6) After bisquing, I glaze the piece with dots (another labor and time-intensive step), each dot on the raised nail-head part of the texture, with a combination of black and pinkish-orange glazes.  After it’s fired, this adds depth of color and a glint to the lizard’s skin, similar to the fresh skin of a newly-molted lizard.  Sometimes, I add a leather tongue, if the monster’s mouth has been made slightly opened.  I’m looking into making a fully-open mouth next time, with wire teeth, giving it a really venomous-looking gape.  Here’s a shot of the finished version, a little more bulbous than an authentic lizard, but — after all, it’s a bowl: claygimo

Etymology

As mentioned above, Heloderma means “nail-skin”, for the fact that the monster’s skin looks studded or beaded rather than scaled.  suspectum, the species name, comes from the fact that early herpetologists were uncertain if the animal were venomous or not, and only suspected it was because of anecdotal accounts of its potentially lethal bite.  Eventually it was confirmed by laboratory experiments, and dissection, which revealed the large venom glands in the lower jaw.

Check out more info about the natural history of these lizards here.

All photos A.Shock

Posted by Allison on Jan 6th 2010 | Filed in art/clay,close in,effigy vessels,etymology/words,increments,natural history,reptiles and amphibians,three star owl | Comments Off on Got Gila Monster?

Quite a Toadly Frog

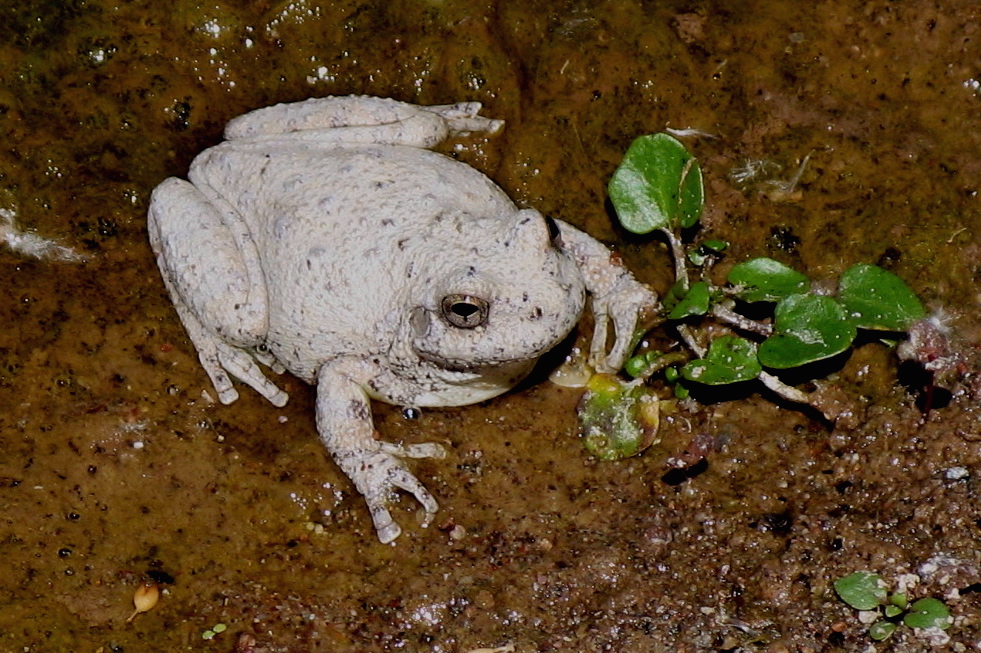
It looks a lot like a toad, with a stumpy physique and warty skin, but it’s a Canyon Tree Frog (Hyla arenicolor).  How to tell it’s a frog? One way: no parotoid glands — instead you can see the round flat areas of its tympani (hearing structures) behind and slightly below the eye. Also, this frog has large adhesive pads on the ends of its toes to aid in climbing (after all it is a tree frog), which most toads don’t do.  Canyon tree frogs are variable in color and spottage (a technical term: feel free to pronounce it spot-AAHJ), but this individual is fairly pale and nearly spot-free. They inhabit rocky stream courses in Arizona and the Southwest with intermittent or permanent water, where they enjoy feeding upon small invertebrates. This one was photographed at Aravaipa Canyon. (Photo A.Shock, 2009)

Etymology

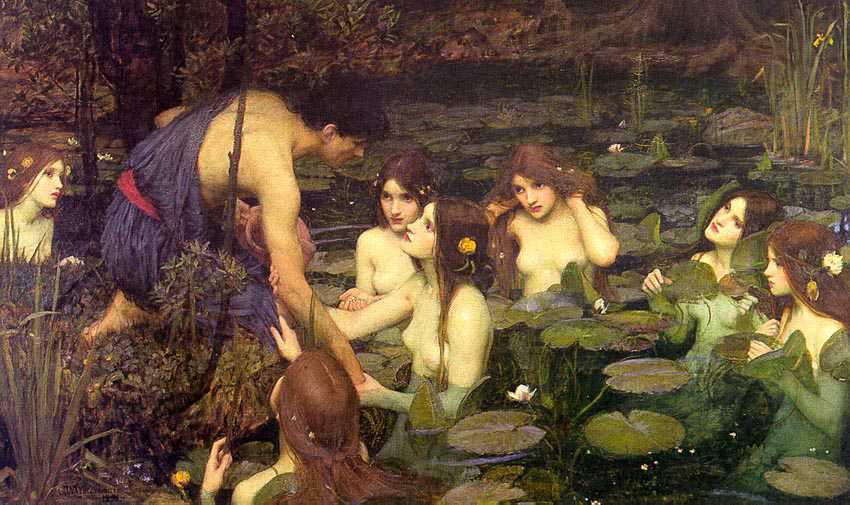
Hyla arenicolor: arenicolor is a Latin compound meaning sand-colored: to the Romans as well as to us, an arena is a sand-covered area.  The origin of the genus Hyla is a bit more complex, and much more picturesque.  To start, the greek work ὗλη — cognate with the more familiar Latin sylva, means woodland, and may come into play in the naming of a genus of tree frogs. But a more colorful tradition connects the genus name with Hylas, one of the original Argonauts who while searching for fresh water ashore was pulled into a woodland spring by a desirous water nymph.  Hylas’s companions — including Herakles and Jason — searched the island for him in vain, crying his name over and over: the story goes that the incessant cry of his name relates to the repetitive calling of tree frogs.

above: the story of the rape of Hylas, “Hylas and the Nymphs” by J.W. Waterhouse, 1896. If you’re lucky enough to be in London during the next couple of weeks, check out the exhibition: J.W.Waterhouse: The Modern Pre-Raphaelite, it’s on at the Royal Academy until 13 Sept 2009. (And, there’s a pleasing similarity between the color schemes of the Waterhouse painting and the tree frog photo at the top: the watery-brown background, ivory skin tones and heart-shaped green foliage.)

Posted by Allison on Aug 24th 2009 | Filed in art/clay,close in,etymology/words,natural history,reptiles and amphibians | Comments (2)

Tweaking Tiny Tins: making mini watercolor kits from mint boxes

2d update, April 2015, about using magnetic tape to secure pans to Altoids tin, see comments

Updated 19 May 2013 (see link at bottom of article)

Everybody in the world has posted their version of the Miniature Watercolor Box, usually ingeniously created from any flat metal tin, often Altoids, sometimes Velamints, or others (see here, here, and here, just for a few examples of many).  These projects are all well-described and illustrated. I hereby add my version, but will only add a couple of tips I think are an improvement on what others have already shown.

As a hiker/backpacker, I’m always looking for a way to carry along sketching and watercolor or gouache supplies that doesn’t take up too much volume or weigh too much. (Or cost too much: commercially made ones are available at artist’s suppliers but seem exorbitant, if pretty cool.) Not all hikes yield usable painting or drawing time, and I want to carry something that I won’t begrudge space to if I don’t get around to using it. So I was enthralled by the mint-tin plein-air kits I saw on the Web.  It’s just the kind of project to seize my imagination, so off I went.  Which brings up the first tip: if this is your kind of project, beware taking up more time constructing your kits (or posting about them!) than painting with them — and I speak from experience — it’s easy to go there.  Although, the preparation can be big fun and have its own rewards.
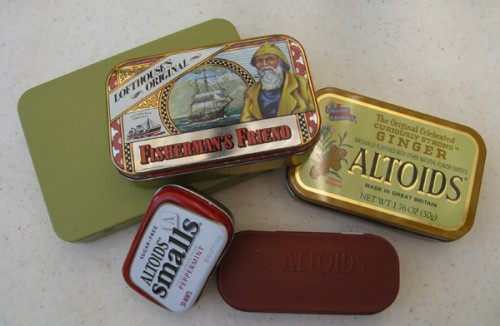
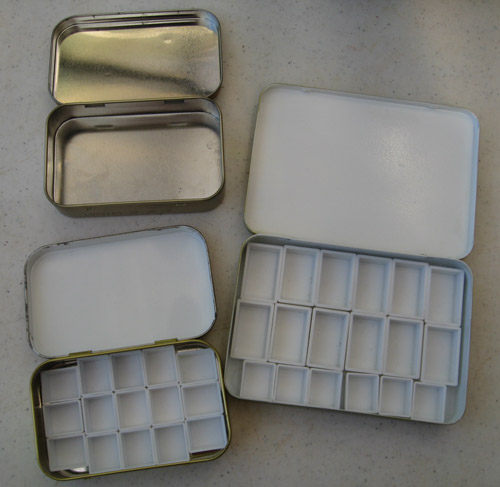
The basic idea is to use empty, flat, metal boxes (such as those in the top photo in various stages of the process) to carry small containers (like contact lens cups, or polymer clay depressions, or purpose-made watercolor half-pans) filled with tube watercolors pre-squeezed out into them and allowed to dry.  The dried colors can be re-wet and used to paint, just like commercially available pan watercolors.  But with a customized mint-tin box, you can choose your own brands and colors, or easily switch them out for landscape, botanical, or portrait projects — whatever you like. (Second tip — don’t glue your pans permanently in place, as some folks recommend.  If they’re inconveniently loose, fasten them down with something temporary, like double-sided tape or that gummy product they sell; or, wedge them in with a bit of sponge or paper towel, which would be useful anyway for blotting. You want to be able to take them out to change or clean.)  Many people like to accompany these tiny paint-boxes with water-brushes like those made by Niji and Sakura, which have water reservoirs in their barrels, so they don’t have to carry extra water in a bottle. (The photo on the right shows the insides of boxes in various stages, the top one awaiting enameling, the other two enameled and awaiting paint selections.)
I don’t think I’m the only one who’s been saving metal Altoids tins for years with the idea that some day they’d come in handy.  Well, this is that day.  It turns out the older ones are best — the ones with the flat lids, without the product name embossed in the lid (like the one below on the left, painted with a red anti-rust primer).  The embossing is fancy, but since the inner lid becomes your mixing surface, a flat one is better (more about fixing that in a minute).

The inner lids of most brands are silver like the top one in the photo above — those are usable, but it’s easier to see your colors if you’re mixing on white. Some tins are already white inside. A few folks have inserted a portion of a plastic mixing tray here; good, but there’s both extra weight and extra work to cut it out of an existing watercolor palette (although you do get to wield your Dremel tool).  Others spray paint the surface white.  That’s the solution I went with, but here’s my next Valuable Tip: don’t just use white spray paint, use spray-on Appliance Enamel, found with the spray paints at hardware or DIY stores. It’s perfect — stain resistant, glossy, very white, quick drying, and rust proof.  It was miraculous to watch a metallic surface become pure white, shiny, and even in just 2-3 coats. I couldn’t stop using the stuff — the cats were lucky they didn’t end up slick and white.  Don’t forget to mask the outside with some tape before spraying.  If you want to obliterate the product labeling on the outside of your tin, use regular indoor-outdoor spray paint for that — I’ve been doing that after spraying the inside (mask it so that slick white surface isn’t contaminated).
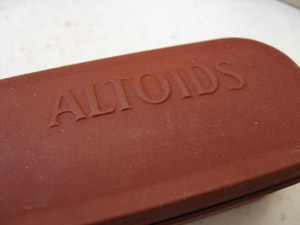
Next tip, about indented lids: if you have an embossed tin lid, your mixing surface will have dents that cause color mixtures to pool.  If this bothers you, start by filling these dents on the inside of the lid with a waterproof product.  I use a modeling product called Apoxie Sculpt.  Just follow the instructions; you can smooth it out with a wet fingertip and then sand when dry.  Polymer clay would work as well, but needs to be oven-cured.  Remember to do your infilling before using the Appliance enamel.  This adds a level of complication to the project, both because of having to do the leveling and procuring the product, but I know your ingenuity is up to it.  If not, just forget it and find a non-embossed tin — they’re out there, but not Altoids, I don’t think — or, use the embossed lid anyway.  It’s not the end of the world. (The photo on the right, below, shows an embossed lid box filled and awaiting enameling, the other box is complete; it’s the rust-colored Altoids gum box above — you can see that the indentations of the lettering have been filled and the lid now has a smooth mixing surface).
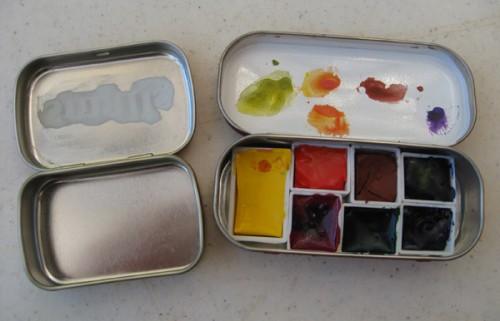
Where to put the paints. Since I don’t wear contacts lenses and don’t have access to old lens cups, I was going to make my own half-pans with polymer clay to hold the paints, but I found I didn’t have the patience to make as many as I would need.  Using a solid pad of clay and making paint depressions in it is a good solution, but not for me: I wanted to be able to change out individual colors.  So I went for purpose-made plastic watercolor pans and half-pans, which wedge snugly into mint tins in various combinations.  Unfortunately, I found that individual empty pans are not easy to find, currently.  Jerry’s Artarama has them in their catalog, but as long as I’ve been working on the project, they’ve been out of stock.  I finally found another supplier, Natural Pigments, a cool vendor in Willetts, CA, who specializes in pigments and supplies for people making their own paints.  They have empty pans available for a good price, but frankly their shipping fees are mysteriously high for such lightweight items.  Still, beggars can’t be choosers, and that’s who I’ve been buying from.  Consider that another hot tip, with a caveat (shipping price).

Now you’re ready to configure your pans geometrically in your prepared tin, and select your palette — both tasks similar to scattering rice in front of a vampire: there are those who obsess on these things.  I won’t presume to dispense advice on color choice, but just a warning: the smaller the tin, the fewer your colors, the harder the choice, for most.

Let me finish off by saying that if this is the kind of project that floats your boat, there are many possibilities: different sizes of tins (to accommodate larger and smaller palettes); traveling tins for gouache (non-acrylic gouaches are re-wettable like watercolors and like them can be squeezed into pans and allowed to dry); and gifts for artist friends, with or without the paints (some artists are picky about their color choices).  Now that Altoids has introduced Smalls, there’s a Really Tiny Tin to challenge your minimalist palette selection.  And finally, modern mint-boxes are great, but how cool would vintage metal boxes be?!  I’m thinking Kiwi shoe polish, for one…

Update: Here’s another artist’s traveling pastille box, with plastic caps for pans.  What a great idea!
Posted by Allison on Aug 19th 2009 | Filed in art/clay,birding,close in,etymology/words,increments,three star owl | Comments (23)

Cnemie-philia

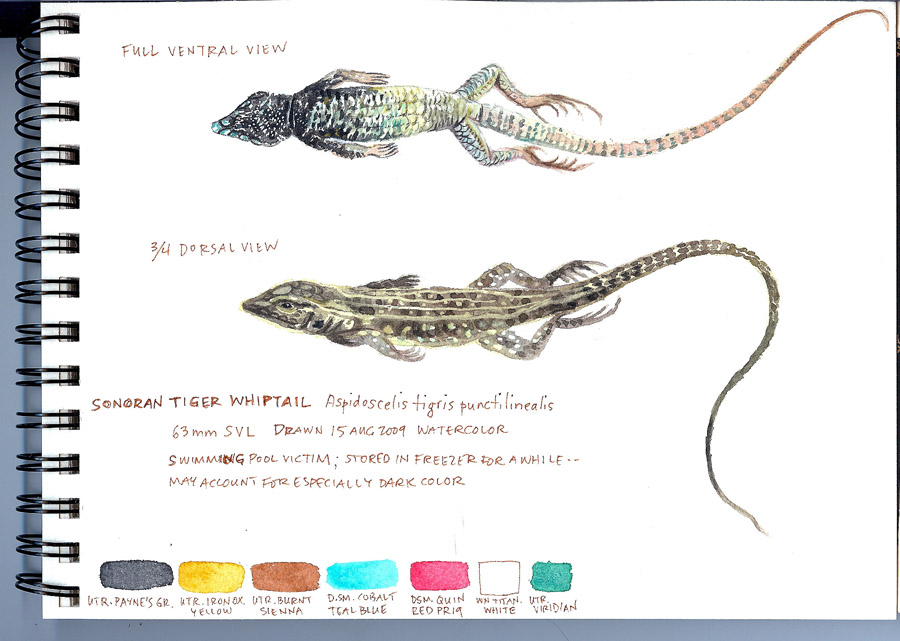
Yes, that’s “Cnemie-philia” — the love of lizards in the genus Cnemidophorus, now more properly called by their current genus name, Aspidoscelis, or Whiptails.  Our locals are Sonoran tiger whiptails (Aspidoscelis tigris punctilinealis), and they’re the most commonly seen lizard in our Phoenix area yard.  They like it hot and are out and about during the the day, except in the highest heat, constantly looking for prey such as insects and ants, which they are welcome to, as our ants have out-sized painful defense methods.  (Yet I love the ants, because they feed the flickers and the whiptails).  The young whiptails have been more in evidence recently, too — tiny whippety slippets of things, sleek and fast with brilliant blue tails that largely void their stripey camouflage against granite gravel.  Maybe the flashy and detachable nearly-neon blue tail is an effective decoy for color-visioned predators, distracting them from more critical body parts.

(Various watercolors in Arches 140 lb coldpress sketchbook, A.Shock; click image to enlarge)

Here’s a watercolor study of a tiger whiptail who, sadly, fell victim to the LaBrea Tarpit of our pool.  I finally took it out of the freezer drawer of our fridge, much to E‘s relief, although there is still a Vaejovis scorpion chilling in there (this is when zip-lock bags really shine, I feel).  When I was through drawing, I took pictures and put the limp, thawed carcass out for a Curve-billed thrasher to find for a meal, but ashes to ashes: the ants found it first, bringing the lizard’s life full circle in a nutritional sense.

Etymology

Lately I’ve been slacking off on supplying etymologies for things, but this one’s already been covered, at the very bottom of the Desert iguana post, along with a swell photo by E of a (Plateau?) tiger whiptail we saw at the Grand Canyon.

Hallux, Retrix and Feak…

…are not a Victorian law firm.

They are delightfully specific bird-related terms: it seems that falconers and ornithologists, like the French, have a different word for everything.

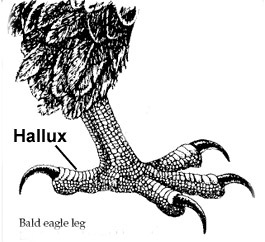
You can talk about a raptor’s “thumb”, meaning the strong digit that in most birds is at the back of the foot, and people will know what you mean.  But there’s a useful Latin term for it, regularly and properly used in both falconry and ornithology: hallux, plural halluces.  Ornithologists have assigned birds’ toes numbers to express foot skeletal structure and toe arrangement, and the counting starts at the hallux: it’s 1.  Used in an informative sentence: “It’s useful to know that if you have a Great horned owl on the glove, and it’s gripped your free hand due to your inattention, ask someone to gently pull its hallux upward to release the grip, avoiding an unpleasant situation involving talons, pain and possible nerve damage.”  Actually, hallux is an anatomical term that refers to our own human big toe, too.  Any word with an X in it ought to be used as much as possible, says I.

That would include the word Retrix, which is a tail feather.  Plural: retrices.  Most birds have ten or twelve, and they are numbered in the order they are shed during a moult, which is from the center of the tail outward: R1 – R6, with the R1s being the two central tail feathers and the R6s being the two outer tail feathers.  Additionally, the two central tail feathers are referred to as the “deck feathers” or, as the French call them, les retrices centrales.  Used in a sentence: “The deck feathers are the first retrices to be moulted out of the tail.”  To learn more about feathers than you wanted to know, check out the Feather Atlas.  (Please remember it’s illegal to collect or own non-game bird feathers, by the way.)

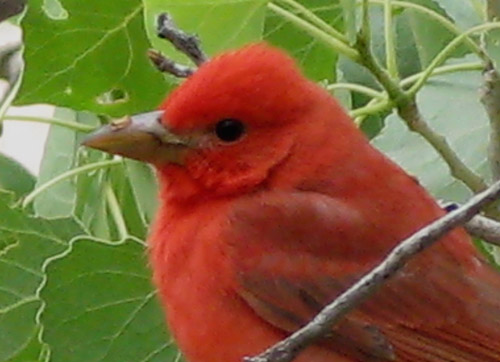
Feak is a verb: feaking describes the action of a bird rubbing or wiping its beak on the perch or branch, usually for cleaning (the beak, not the branch).  Raptors do this after feeding to remove excess matter from the beak.  Songbirds do it as well, including hummingbirds whom I’ve seen feak after slurping at a nectar feeder.  It is a side-to-side motion, like sharpening a knife.  A raptor bends forward to feak, a hummingbird just tucks its chin.  Unlike the words hallux and retrix which are from the Latin, feak is an Anglo-Saxon word, and though it doesn’t have an X, needs to be said often, just to hear the sound it makes. Used in a sentence: “The Summer tanager should have feaked after eating that juicy katydid.” By the way, I think the French word for feak is feak, but I’m not positive.

Falconry is well-stocked with this and other specialist vocabulary, like stoop, warble and rouse, or yarak, haggard and crab — not to mention bate, creance and imp — each of which sounds like a Bleak House Dream Team.

(Photo, Summer tanager, A.Shock)

Posted by Allison on Jul 26th 2009 | Filed in birding,birds,etymology/words | Comments Off on Hallux, Retrix and Feak…

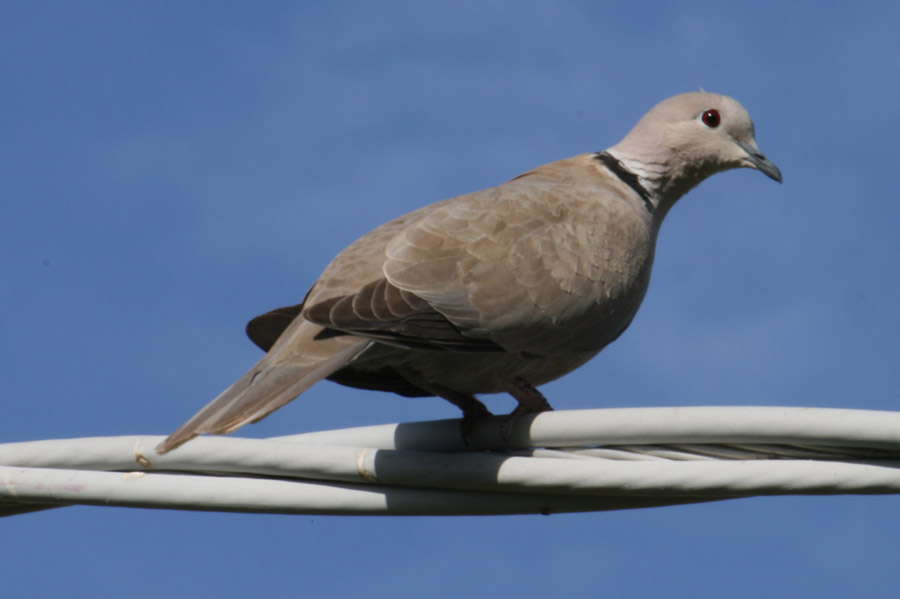
Festival of Desert Doves: the Other Collared Dove

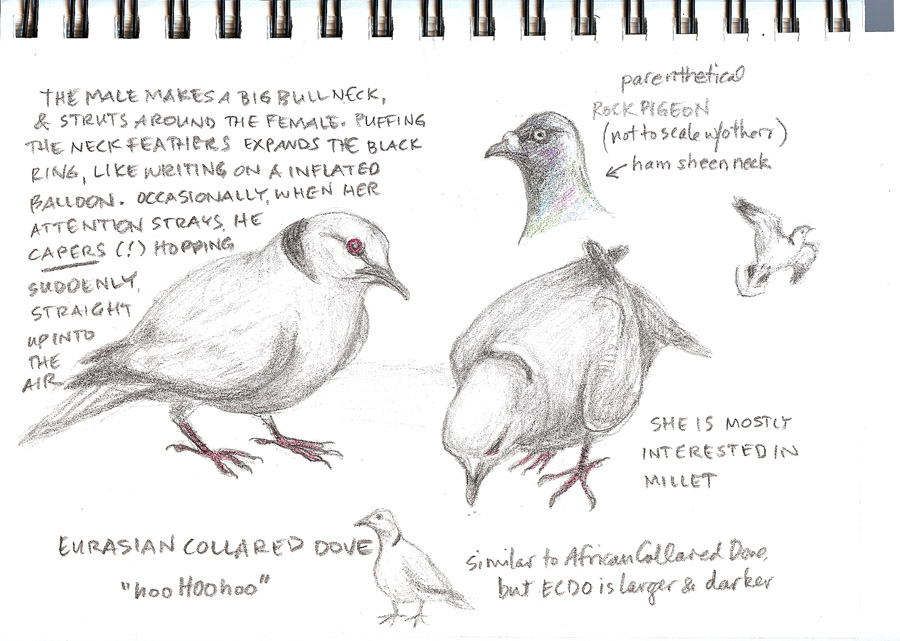
The Eurasian Collared Dove (Streptopelia decaocto) has an agenda well-befitting a Columbid: “Must Colonize New World.”

Actually, it started before that, and a lot farther east: a native of central Asia, the Collared Dove had populated Europe as far west as Great Britain by the 1950s.  By the early ’80s, a population had taken hold in Florida, likely coming from the Bahamas where they also had been introduced (or escaped captivity) in the 1970s. From there, the large doves filled the southeastern US, and have been spreading inexorably west and north.  The first documented report of the species in the state of Arizona was in Eager, AZ, on March 6, 2000, and they were regularly sighted in Maricopa County by the end of the same year.

As mentioned in a previous post, they’re quite similar to the African Collared Dove (which used to be called the Ringed Turtle Dove), but they’re bigger, and a darker beige, and have different vocalizations.  In the Phoenix area and over much of Arizona, Eurasian Collared Doves have become quite numerous — on some days I would ungenerously call them a pest in our yard — and a few theories exist as to why they’ve spread so rapidly.  One is that they fill a niche left empty by the extinction of the Passenger Pigeon  (Perhaps in the Northeast U.S., but I’m not so sure that applies to the desert regions?).

Like the African Collared Doves, they show a disturbing willingness to become tame, and quickly learn  to fly down to empty feeders when they see someone coming out with a bag of birdseed.  I’ve caught them lurking on top of my studio — their toenails clicking on the roof, their pink foot skin glowing hazily through the translucent plexi panels — as if lobbying for the filling of neglected feeders in a kind of inexorable zombie-like way.  They’re hard to miss since their arrival is a dry noisy wing flapping, the thump of a hard landing of a big heavily-wingloaded airship, and the inevitable repetitive hoo-ing and gibbering that follows.

(Images: pencil sketchbook drawing and photo by A.Shock)

Posted by Allison on Jun 26th 2009 | Filed in art/clay,birds,close in,drawn in,etymology/words,natural history,yard list | Comments Off on Festival of Desert Doves: the Other Collared Dove

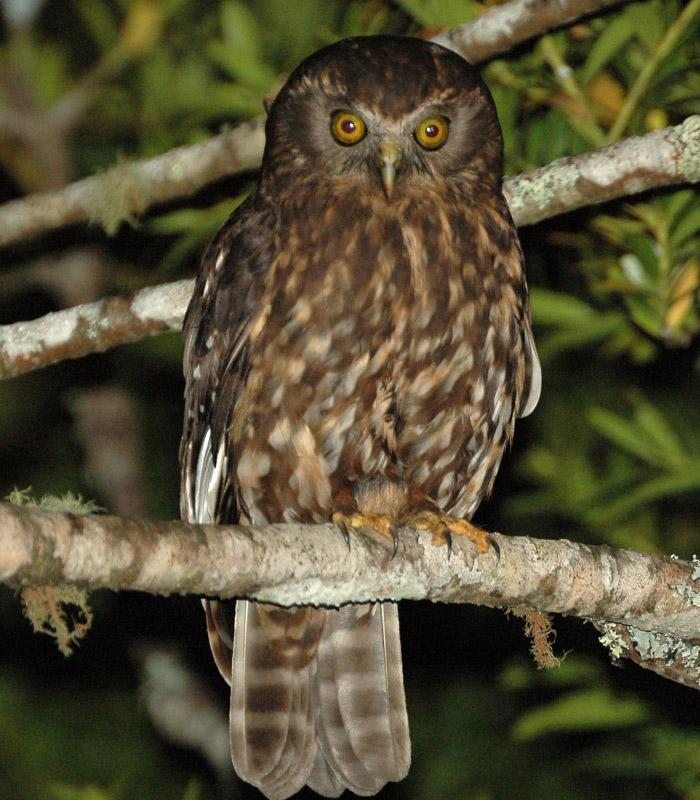
One of the best things we DIDN’T see in New Zealand…

…was a Ruru, or Morepork (Ninox novaeseelandiae).

It’s NZ’s only remaining native owl (the Laughing owl was last recorded in 1914), and is fairly common in many habitats, even parks and gardens, but is especially numerous in tracts of native bush.  We heard them several places, mostly in the Kauri Forest while on a night walk looking for Kiwi.  They whinny and whoo and screek, but their main call is, not surprisingly, “More-pore” repeated frequently.  If you live where there are Inca Doves, you know what a Morepork sounds like.  Inca doves’ call is usually transcribed as “whirl-pool” or “no-hope”, but in pitch, frequency, and tone, it’s very much like the owl’s call.  The Māori name, Ruru, is also onomatopoetic, as is the Australian name, (Southern) Boobook.

Ruru is a relatively small (approx 10″ ht), long-tailed owl that takes a range of prey but specializes in nocturnal insects like weta (large crickets — really large crickets!), huhu beetles and moths.

(Photo by Aviceda from Wikimedia Commons)

Posted by Allison on Jun 1st 2009 | Filed in birds,etymology/words,field trips,natural history,owls | Comments Off on One of the best things we DIDN’T see in New Zealand…

« Prev - Next »