payday loans

Archive for the 'increments' Category

You are currently browsing the archives of Three Star Owl – Functional and Sculptural Clay Artwork with a Natural History .

Squeezing out horned lizards from clay

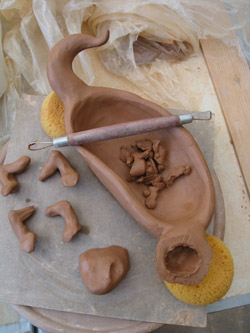
A new batch of clay horned lizards under way — early steps:

From top to bottom:

1) Rough out body shape by pinching; head and tail included in starting clay lump.

2) Create appendages: horns, limbs.  Allow to “set up” or slightly stiffen, while: refining body shape of liz.

3) Further refine body shape; note detail in head, side fringe.

The next steps are where time starts becoming a factor — these guys won’t “hatch” for quite a while yet. Stay tuned!

(Photos A.Shock)

Posted by Allison on Feb 17th 2010 | Filed in art/clay,increments,reptiles and amphibians,three star owl | Comments (1)

Got Gila Monster?

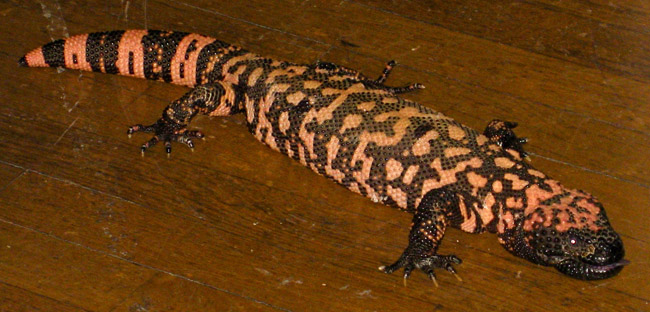
Gila monsters (Heloderma suspectum) are large stumpy lizards with bright handsome markings that are both cryptic and aposematic simultaneously, and whose hands look like neoprene wetsuit gloves with claws.  They are remarkable for being one of only two venomous lizard species in the world.  They live in the Sonoran and southern Great Basin Deserts and love to eat quail eggs, nestling birds and mammals, and other slow-moving prey items. (Below: captive gila monster on a wooden schoolhouse floor, photo A.Shock)captivegimo

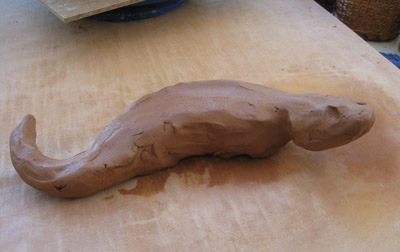
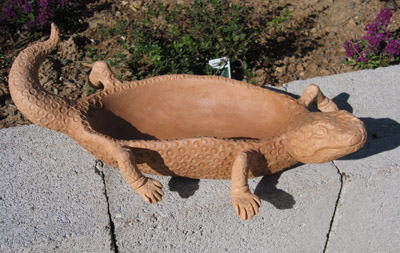
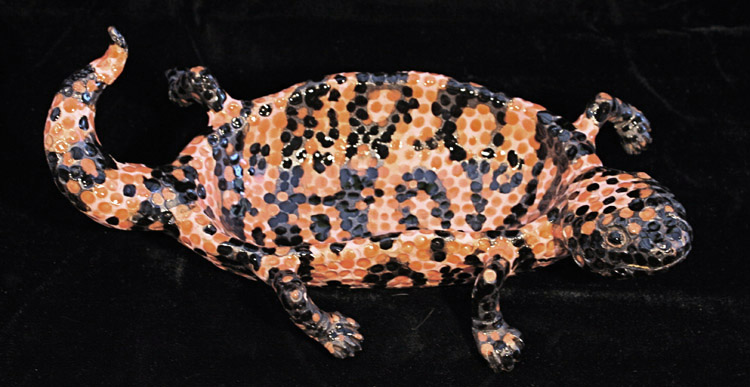
Approximately life-sized clay Gila Monster “bowls” are items I only make one or two of per year or so. They’re quite time-consuming, since they’re textured, slipped, and glazed pretty much beaded lumpGIMOscale by beaded scale.  Here’s one now :

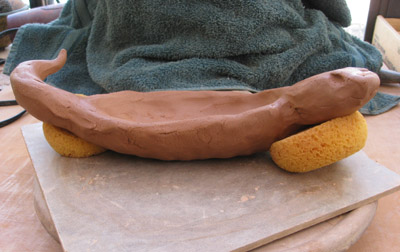
1)  I form a blob of clay that looks like a gila monster.  This early stage is the time to get any sinuousness in the tail, neck and belly, so the clay “remembers” it.  Then it’s time to put the wet lump aside to set up, or stiffen slightly, so that it can be shaped further.  Sponges help hold a pose, if spongeGIMOdesired.  >>

2)  As the water leaves it, the clay becomes more self-supporting.  While waiting for this to happen, I make legs — oddly spindly for such a stout body — with blocked out feet, to stiffen for adding later.  I also hollow out two thick places in the monster body, to aid in drying: the head, and the base of hollowheadGIMOthe tail.  This also makes the completed piece lighter and better balanced.  It is important to make a tiny, invisible passage into the hollow part from the outside, to let air escape during firing, or there could be an explosion.  <<

3)   With the clay slightly stiffer, I smooth the shape into its final form, including carving the toes from the blocked-out “hands”, and rounding the belly “bowl” part.  This shape causes herp boys to giggle, because it makes the lizard look like roadkill to those with scavenging permits for heloderm pelts.  From my point of view, it makes the piece functional, if desired: an Effigy Vessel, and not just a representation.

4)  The next step is to attach the legs, and texture the skin.  This must be done at a particular point of dryness, when the clay is still wet enough to accept the stamps I use to make the “nail-heads” in the skin (Heloderma bonedryGIMOmeans “nail-skin”), but stiff enough to hold up to the handling and pressure of stamping it.  Then it’s waiting for it to be bone-dry for slipping (right).  >>

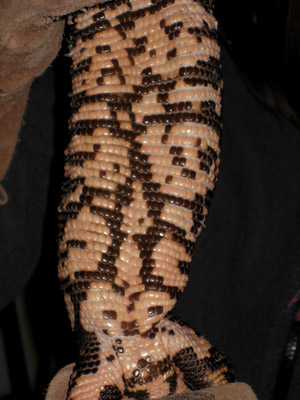
The belly-texture, which looks like pink-and-black Indian corn on the cob, is carved into the clay rather than stamped — this is particularly time-consuming, especially for a part that isn’t seen very frequently.  Early on, I searched the web for a reference photo for Gi-Mo belly-scales, and never found one.  Fortunately, I persuaded a handler at a wildlife education event to flip a live one up for photos (she held it vertically, not upside-down), and got this great shot, which tells me all I need gimobellyto know about what the unders of a monster look like, including vent details (<< left).  You can just see the heavy-duty cowhide welding gloves the handler was wearing; they were covered with black half-moons: venom-marks from previous crabby bites.  <<

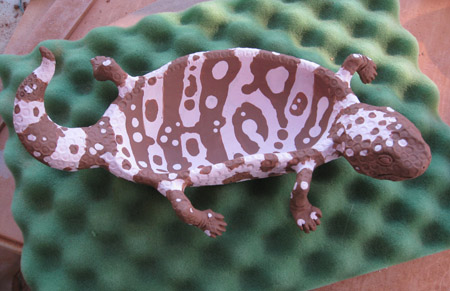
5)  Slipping an item bone dry is slightly risky, as adding water to a piece at this point can cause cracking.  But adding slip to a dry surface gives a crisper, less texture-obscuring coating.  I use a combo of commercial under-glazes and slips I make in the studio.  It’s necessary at this point to choose the subspecies:slippedGIMO the banded H.s. cinctum from the northern part of its range, or H.s. suspectum from the southern part, which has a more complicated reticulated pattern.  This one is kind of a combo. >>

6) After bisquing, I glaze the piece with dots (another labor and time-intensive step), each dot on the raised nail-head part of the texture, with a combination of black and pinkish-orange glazes.  After it’s fired, this adds depth of color and a glint to the lizard’s skin, similar to the fresh skin of a newly-molted lizard.  Sometimes, I add a leather tongue, if the monster’s mouth has been made slightly opened.  I’m looking into making a fully-open mouth next time, with wire teeth, giving it a really venomous-looking gape.  Here’s a shot of the finished version, a little more bulbous than an authentic lizard, but — after all, it’s a bowl: claygimo

Etymology

As mentioned above, Heloderma means “nail-skin”, for the fact that the monster’s skin looks studded or beaded rather than scaled.  suspectum, the species name, comes from the fact that early herpetologists were uncertain if the animal were venomous or not, and only suspected it was because of anecdotal accounts of its potentially lethal bite.  Eventually it was confirmed by laboratory experiments, and dissection, which revealed the large venom glands in the lower jaw.

Check out more info about the natural history of these lizards here.

All photos A.Shock

Posted by Allison on Jan 6th 2010 | Filed in art/clay,close in,effigy vessels,etymology/words,increments,natural history,reptiles and amphibians,three star owl | Comments Off on Got Gila Monster?

Tweaking Tiny Tins: making mini watercolor kits from mint boxes

2d update, April 2015, about using magnetic tape to secure pans to Altoids tin, see comments

Updated 19 May 2013 (see link at bottom of article)

Everybody in the world has posted their version of the Miniature Watercolor Box, usually ingeniously created from any flat metal tin, often Altoids, sometimes Velamints, or others (see here, here, and here, just for a few examples of many).  These projects are all well-described and illustrated. I hereby add my version, but will only add a couple of tips I think are an improvement on what others have already shown.

As a hiker/backpacker, I’m always looking for a way to carry along sketching and watercolor or gouache supplies that doesn’t take up too much volume or weigh too much. (Or cost too much: commercially made ones are available at artist’s suppliers but seem exorbitant, if pretty cool.) Not all hikes yield usable painting or drawing time, and I want to carry something that I won’t begrudge space to if I don’t get around to using it. So I was enthralled by the mint-tin plein-air kits I saw on the Web.  It’s just the kind of project to seize my imagination, so off I went.  Which brings up the first tip: if this is your kind of project, beware taking up more time constructing your kits (or posting about them!) than painting with them — and I speak from experience — it’s easy to go there.  Although, the preparation can be big fun and have its own rewards.
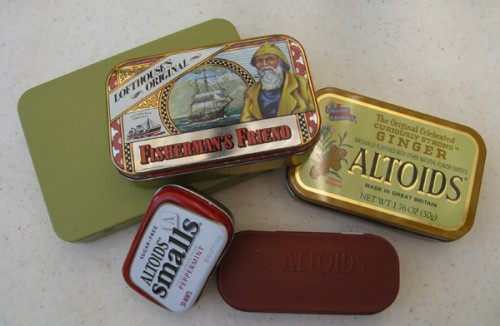
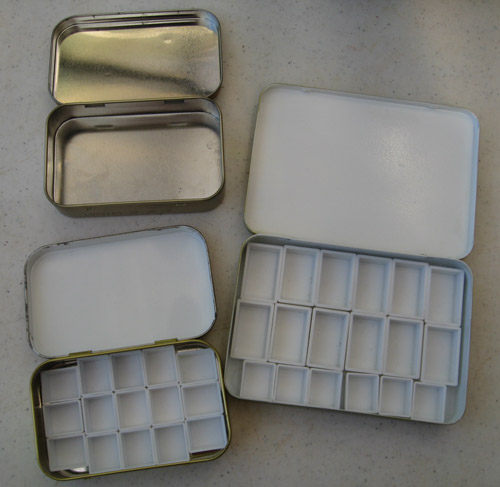
The basic idea is to use empty, flat, metal boxes (such as those in the top photo in various stages of the process) to carry small containers (like contact lens cups, or polymer clay depressions, or purpose-made watercolor half-pans) filled with tube watercolors pre-squeezed out into them and allowed to dry.  The dried colors can be re-wet and used to paint, just like commercially available pan watercolors.  But with a customized mint-tin box, you can choose your own brands and colors, or easily switch them out for landscape, botanical, or portrait projects — whatever you like. (Second tip — don’t glue your pans permanently in place, as some folks recommend.  If they’re inconveniently loose, fasten them down with something temporary, like double-sided tape or that gummy product they sell; or, wedge them in with a bit of sponge or paper towel, which would be useful anyway for blotting. You want to be able to take them out to change or clean.)  Many people like to accompany these tiny paint-boxes with water-brushes like those made by Niji and Sakura, which have water reservoirs in their barrels, so they don’t have to carry extra water in a bottle. (The photo on the right shows the insides of boxes in various stages, the top one awaiting enameling, the other two enameled and awaiting paint selections.)
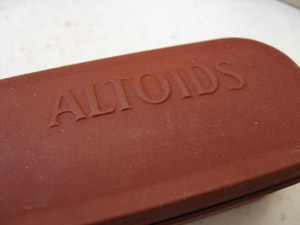
I don’t think I’m the only one who’s been saving metal Altoids tins for years with the idea that some day they’d come in handy.  Well, this is that day.  It turns out the older ones are best — the ones with the flat lids, without the product name embossed in the lid (like the one below on the left, painted with a red anti-rust primer).  The embossing is fancy, but since the inner lid becomes your mixing surface, a flat one is better (more about fixing that in a minute).

The inner lids of most brands are silver like the top one in the photo above — those are usable, but it’s easier to see your colors if you’re mixing on white. Some tins are already white inside. A few folks have inserted a portion of a plastic mixing tray here; good, but there’s both extra weight and extra work to cut it out of an existing watercolor palette (although you do get to wield your Dremel tool).  Others spray paint the surface white.  That’s the solution I went with, but here’s my next Valuable Tip: don’t just use white spray paint, use spray-on Appliance Enamel, found with the spray paints at hardware or DIY stores. It’s perfect — stain resistant, glossy, very white, quick drying, and rust proof.  It was miraculous to watch a metallic surface become pure white, shiny, and even in just 2-3 coats. I couldn’t stop using the stuff — the cats were lucky they didn’t end up slick and white.  Don’t forget to mask the outside with some tape before spraying.  If you want to obliterate the product labeling on the outside of your tin, use regular indoor-outdoor spray paint for that — I’ve been doing that after spraying the inside (mask it so that slick white surface isn’t contaminated).
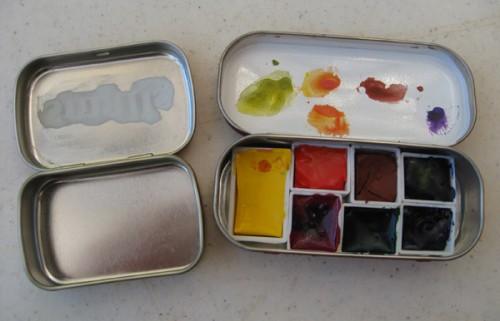
Next tip, about indented lids: if you have an embossed tin lid, your mixing surface will have dents that cause color mixtures to pool.  If this bothers you, start by filling these dents on the inside of the lid with a waterproof product.  I use a modeling product called Apoxie Sculpt.  Just follow the instructions; you can smooth it out with a wet fingertip and then sand when dry.  Polymer clay would work as well, but needs to be oven-cured.  Remember to do your infilling before using the Appliance enamel.  This adds a level of complication to the project, both because of having to do the leveling and procuring the product, but I know your ingenuity is up to it.  If not, just forget it and find a non-embossed tin — they’re out there, but not Altoids, I don’t think — or, use the embossed lid anyway.  It’s not the end of the world. (The photo on the right, below, shows an embossed lid box filled and awaiting enameling, the other box is complete; it’s the rust-colored Altoids gum box above — you can see that the indentations of the lettering have been filled and the lid now has a smooth mixing surface).
Where to put the paints. Since I don’t wear contacts lenses and don’t have access to old lens cups, I was going to make my own half-pans with polymer clay to hold the paints, but I found I didn’t have the patience to make as many as I would need.  Using a solid pad of clay and making paint depressions in it is a good solution, but not for me: I wanted to be able to change out individual colors.  So I went for purpose-made plastic watercolor pans and half-pans, which wedge snugly into mint tins in various combinations.  Unfortunately, I found that individual empty pans are not easy to find, currently.  Jerry’s Artarama has them in their catalog, but as long as I’ve been working on the project, they’ve been out of stock.  I finally found another supplier, Natural Pigments, a cool vendor in Willetts, CA, who specializes in pigments and supplies for people making their own paints.  They have empty pans available for a good price, but frankly their shipping fees are mysteriously high for such lightweight items.  Still, beggars can’t be choosers, and that’s who I’ve been buying from.  Consider that another hot tip, with a caveat (shipping price).

Now you’re ready to configure your pans geometrically in your prepared tin, and select your palette — both tasks similar to scattering rice in front of a vampire: there are those who obsess on these things.  I won’t presume to dispense advice on color choice, but just a warning: the smaller the tin, the fewer your colors, the harder the choice, for most.

Let me finish off by saying that if this is the kind of project that floats your boat, there are many possibilities: different sizes of tins (to accommodate larger and smaller palettes); traveling tins for gouache (non-acrylic gouaches are re-wettable like watercolors and like them can be squeezed into pans and allowed to dry); and gifts for artist friends, with or without the paints (some artists are picky about their color choices).  Now that Altoids has introduced Smalls, there’s a Really Tiny Tin to challenge your minimalist palette selection.  And finally, modern mint-boxes are great, but how cool would vintage metal boxes be?!  I’m thinking Kiwi shoe polish, for one…

Update: Here’s another artist’s traveling pastille box, with plastic caps for pans.  What a great idea!
Posted by Allison on Aug 19th 2009 | Filed in art/clay,birding,close in,etymology/words,increments,three star owl | Comments (23)

Howdy from Sierra Vista, Arizona

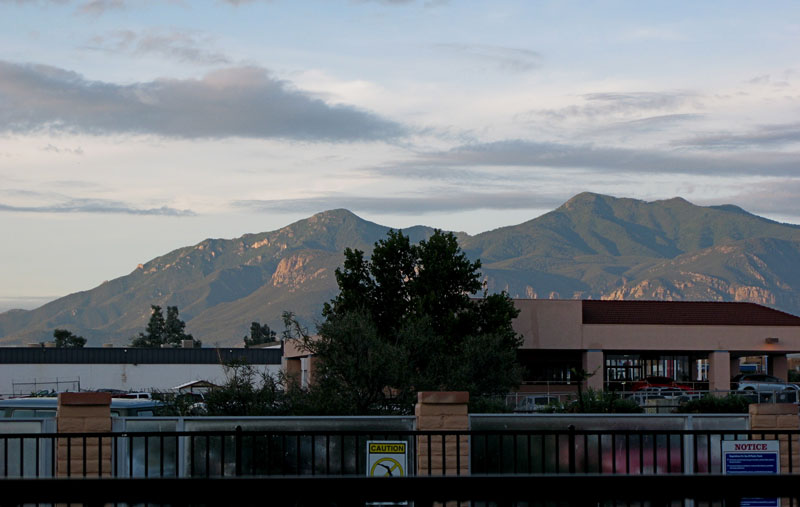
Gaze upon Sierra Vista, in south eastern Arizona, where the beautiful Huachuca Mountains beetle over the fast food restaurants and motels of the busy town.  Not visible in this shot, but also beetling, is the everpresent and mysterious white surveillance blimp.  One day, I will find out about the white blimp.  Maybe today.

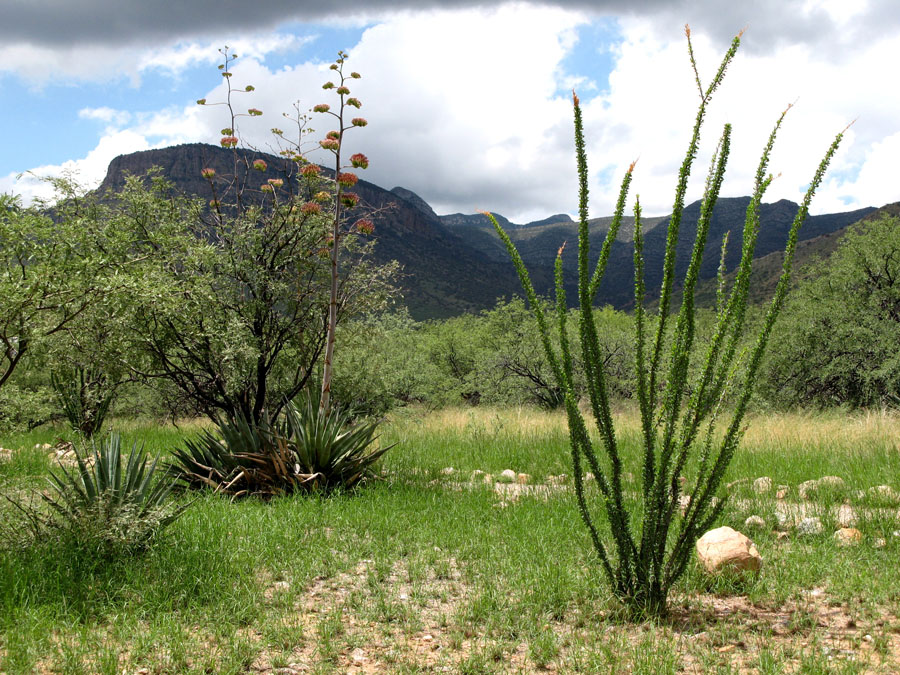
The natural beauty of the region is not far away; below is a view of the foothills of the Whetstone Mountains just north of Sierra Vista.  The landscape here is transitional between the Sonoran and Chihuahuan deserts, and is high enough to be more grassland and thornscrub than desert.  But this trail in Kartchner Caverns State Park has ocotillo, agave (in bloom) and barrel cactus, and a mix of desert and arid scrubland birds, like Curve-billed thrasher, Greater roadrunner and Varied bunting.  (Not that I’m seeing many birds — inexplicably, I forgot my binox!  I guess I’ll have to be an artist this weekend, and not a birder…)  The landscape is lush and green, even in a moderate monsoon year.  Most of the rainfall of the entire year falls during the summer monsoon season.

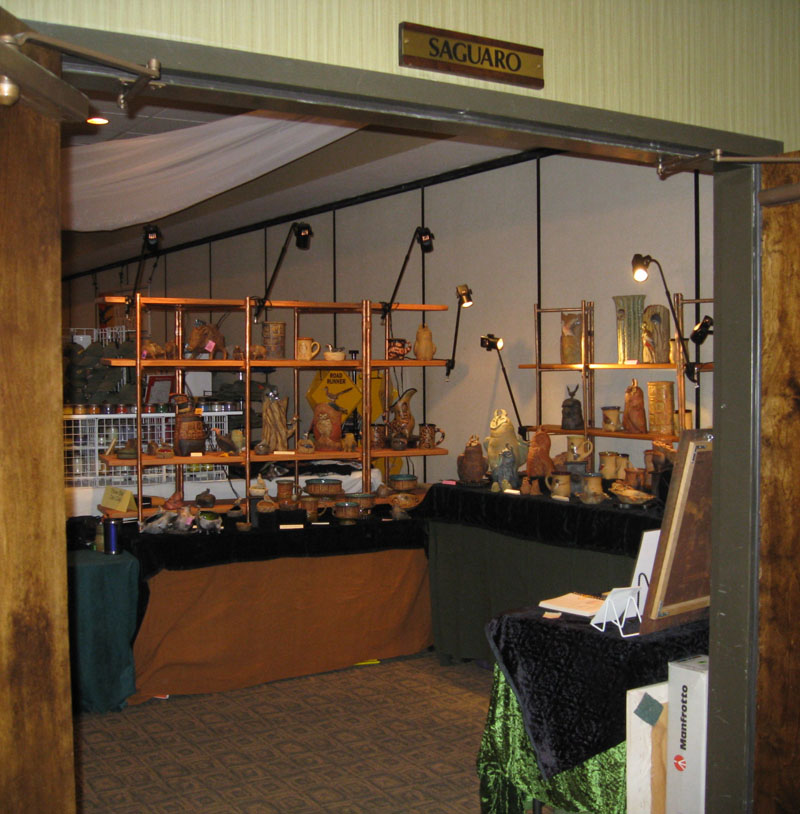
Southwest Wings Birding and Nature Festival is in full swing and Three Star Owl is in the thick of things. Yesterday was the first day of the Art Fair and Nature Exposition, and lots of people came for the vendors and artists as well as the birds.  Purchases were made: owls, javelinas, black-headed grosbeaks, and gila monsters found nice new homes.  Peek into the Saguaro Room at the Windemere Hotel, and the first thing you see is the Three Star Owl booth.  (Really, why is it always so hard to get a good booth shot?  In person, the set-up looks quite nice.)  My only sorrow is that the hotel hasn’t turned on the twinkle lights buried in the tulle swagging overhead, left over from somebody’s wedding party.

(All photos A.Shock)

Posted by Allison on Aug 7th 2009 | Filed in art/clay,birding,Events,field trips,increments,natural history,three star owl | Comments Off on Howdy from Sierra Vista, Arizona

Have a Javelina, or two

Days are getting short until Three Star Owl‘s third appearance at Southwest Wings Birding and Nature Festival, and I’m in a groove, making pieces for the event.  As posted, I’ve been making mugs, and also owls.  Lots of owls.  Even more owls than usual.

So recently I turned to the hairy side of Sonoran fauna, and have been doing Javelinas.  Javelina items are popular with Three Star Owl clients, both Arizonans and visitors to the desert.  Interestingly, it’s often people who have lived their lives in the less urban areas of AZ who are NOT fans of the rooting, tusk-bearing mammal: they may have grown up thinking of them as pesky neighbors, and are weary of battling them over landscaping, gardens, and garbage, or are tired of sewing up the hound.

But in general, javelinas have lots of fans.  I was thrilled when a herd temporarily moved into our neighborhood a few years ago. They were flooded out of their usual habitat during a rainy year when the Salt River swamped the Goodding’s willow woods growing up in its channelized banks.  They did a bit of damage in yards, including ours, but I also still remember the thrill of hearing clicking sounds coming up the street, and looking up to see a mama with two quite young piglets following her!

Javelinas are not true pigs: they are pig-like mammals in the peccary family, Tayassuidae, and have a New World origin as opposed to pigs and swine, family Suidae, which originated in the Old World.  Our javelinas are also called Collared Peccaries, and live in a wide geographical range and a variety of habitats in the arid Southwestern U.S.  There are three other species of peccary in the Americas, which live throughout Central and South America: White-lipped, Chacoan, and Giant Peccaries.

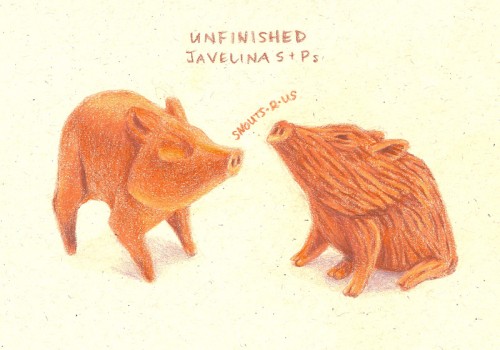
Three Star Owl will be offering Javelina candle-holders and salt and pepper shakers for your table.  Here’s a colored pencil drawing of a pair of shakers in progress.  It’s not the drawing that’s “unfinished” it’s the clay objects, which are in two stages of completion, still in wet clay.  One is modeled and textured, the other not yet detailed or textured.  The shaker holes are the nostrils at the end of their snouts, and each one is re-fillable through neat rubber plugs in their bellies.

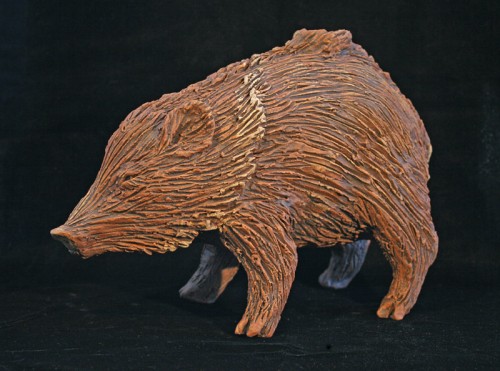
And here is a larger candle-holder, completed. The salt and peppers will have the same coloration, matte slips and oxides, with a little sparkle in the eye.

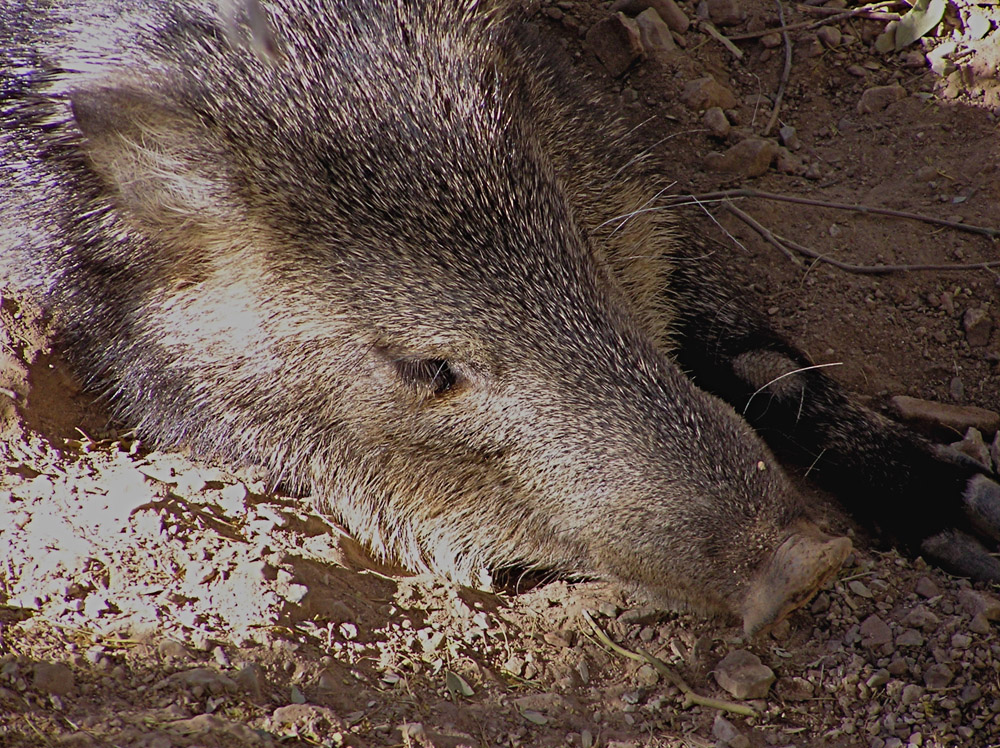
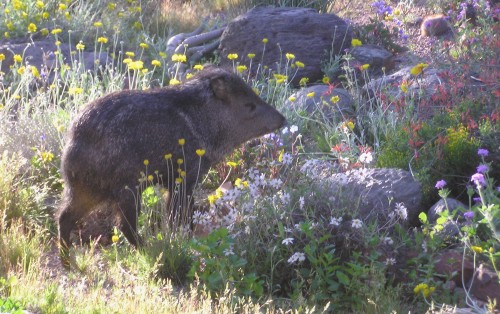
(Photos: top, javelina dirt-napping at the Arizona Sonora Desert Museum, E.Shock; javelina in our front garden, munching spring wildflowers, A.Shock; colored pencil sketch on recycled, speckled paper, A.Shock; Three Star Owl javelina candle holder, A.Shock)

Posted by Allison on Jul 15th 2009 | Filed in art/clay,drawn in,Events,increments,natural history,three star owl,yard list | Comments Off on Have a Javelina, or two

A new batch of “Songbird” mugs is underway

I’m now in heavy production mode for the upcoming Southwest Wings Birding and Nature Festival in southeastern Arizona (see Events for details).  Some of the objects I’m making in small batches are smooth-surfaced mugs for glazing bird portraits on.  Flat-bottomed, hand-built (as opposed to wheel-thrown), and intended for daily use, these mugs have proven popular items at nature festivals and among Three Star Owl‘s birding clientele.  Who wouldn’t want to drink their favorite beverage out of their favorite bird mug?

I recently finished a batch for a client with a home in the Colorado Rockies, and here are a few shots of the process.  One of the reasons I’d like to share these photos is so folks can have an idea of the amount of work that goes into these mugs, which have three images of a species on each cup.

The mugs start out as flat rectangular slabs of clay that I make with a rolling pin and hardwood slats from the “home improvement center” as guides for thickness: very high tech.  (Many potters have slab rollers in their studios, which are fabulous items for making clay flat, but they’re big, and I’m not giving the swamp cooler the boot when a rolling pin and some wood molding will do.)  Then I curl the clay rectangles into a cylinder, seal up the side seam, add a slab base, a rim coil and a coil handle, and dry them very slowly over a period of several days.

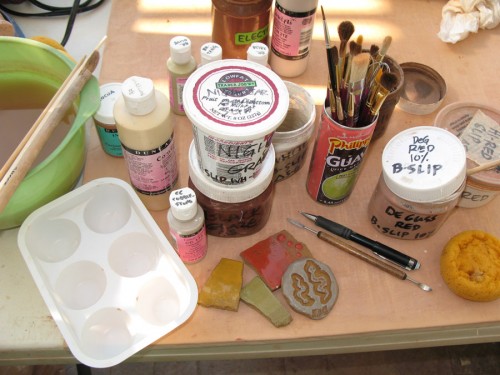
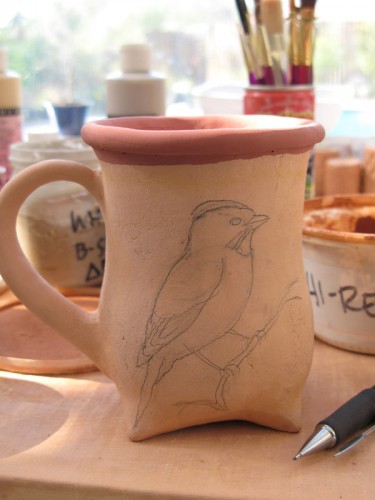
After they’re bisqued, I draw the outline sketch of the chosen bird with regular no.2 graphite pencil right on to the clay.  This is convenient because I can erase pencil lines or whole drawings if they don’t go as planned (although nothing eats through erasers like rubbing on bisqued clay!), but I don’t have to remove the lines before the final firing: the temperature in the kiln is sufficiently hot to burn off the pencil completely.  The photo above gives a general idea of the tools used for glazing; the one to the right shows the roughed-in pencil sketch for a Green-tailed towhee.  (Remember to click on any image you’d like a closer look at).

The next step is glazing the interior: that happens before glazing the images on the outside, so the glaze doesn’t drip down a finished bird while pouring out the extra from the mug’s interior.

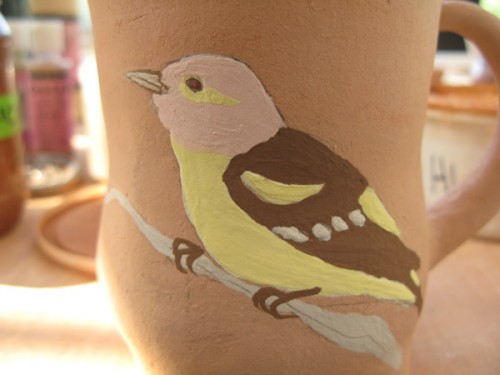
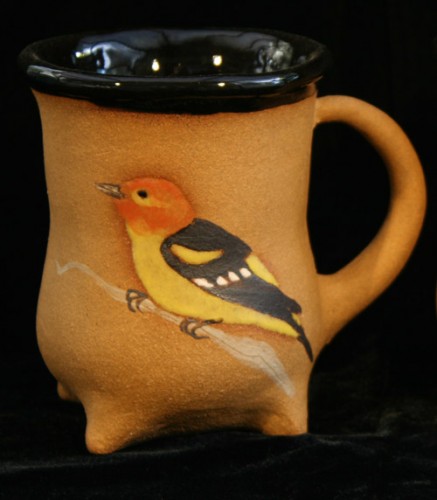
Next, I brush the glazes on.  This is like painting, without the advantage of being able to see what the image will look like with its proper colors.  This is because most raw glazes have very little in common visually with their finished, fired selves.  They go from chalky, pastel flat patches to shiny, brightly hued areas often with brush strokes visible where the thickness of the glaze varies.  These two photos show the difference between a male Western tanager, before and after:

Each mug has an image of the bird on each side, often the male on one side and the female on the other, and a thumbnail sketch, usually a profile portrait of the bird, on the bottom.  The bottom image must be done with matte slips, so they don’t stick to the kiln shelves during firing.

This batch of birds is spoken for, but if you’d like some of your own, contact me and I’d be happy to make you your own, with your own choice of birds (for details click on Shop).  Or, come visit Three Star Owl in Sierra Vista and see what’s in stock at Southwest Wings this August.

(all photos A.Shock)

Posted by Allison on Jul 8th 2009 | Filed in art/clay,birds,close in,drawn in,Events,increments | Comments Off on A new batch of “Songbird” mugs is underway

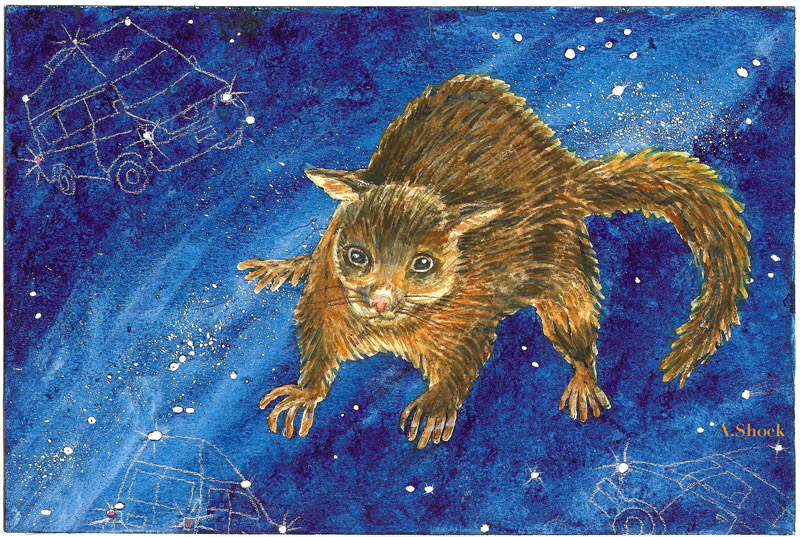
Constellation Alien Invader Roadkill…

…in which Galactic Possum battles the Celestial Army of Campervans and nearly always loses.  Nearby constellation Ferafelis vorax waits to feast on the carnage.  Visible only in the Southern Hemisphere.

(A.Shock 2009, 6″x9″ Watercolor, gouache and charcoal)

Posted by Allison on Jun 11th 2009 | Filed in art/clay,drawn in,increments,oddities,three star owl | Comments Off on Constellation Alien Invader Roadkill…

So what about the Hen?

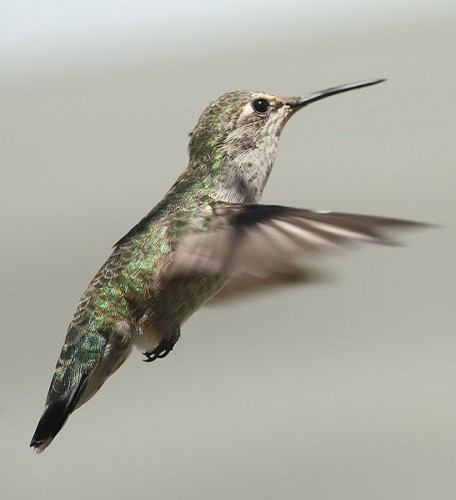
You may be wondering about the much-posted Hen, a female Anna’s hummingbird, and her two nestlings, who were busy growing up in an Aleppo Pine in our back yard.

As far as we know, the Hen fledged her young successfully while we were in New Zealand. We’ll never know for sure, but the evidence supports a successful fledging. Two years ago, a nest failed when it was torn down by a predator, but this nest looks as if it lasted through a full nesting cycle: it’s intact on its branch and a little stretched out, the way spider-web-based hummer nests are designed to do to accomodate growing nestlings.  So, it’s entirely possible that the Stalwart Hen is sitting on a new nest at this time (although it’s past peak Anna’s breeding season in the low desert), and her fledglings are among the YOY (young of the year) Anna’s we see coming to the nectar feeders.

(Photo of female Anna’s hummingbird by M. Held, from Wikimedia Commons)

Posted by Allison on May 20th 2009 | Filed in birds,close in,increments,natural history,nidification,yard list | Comments Off on So what about the Hen?

Easter Nidification: Stalwart Hen update

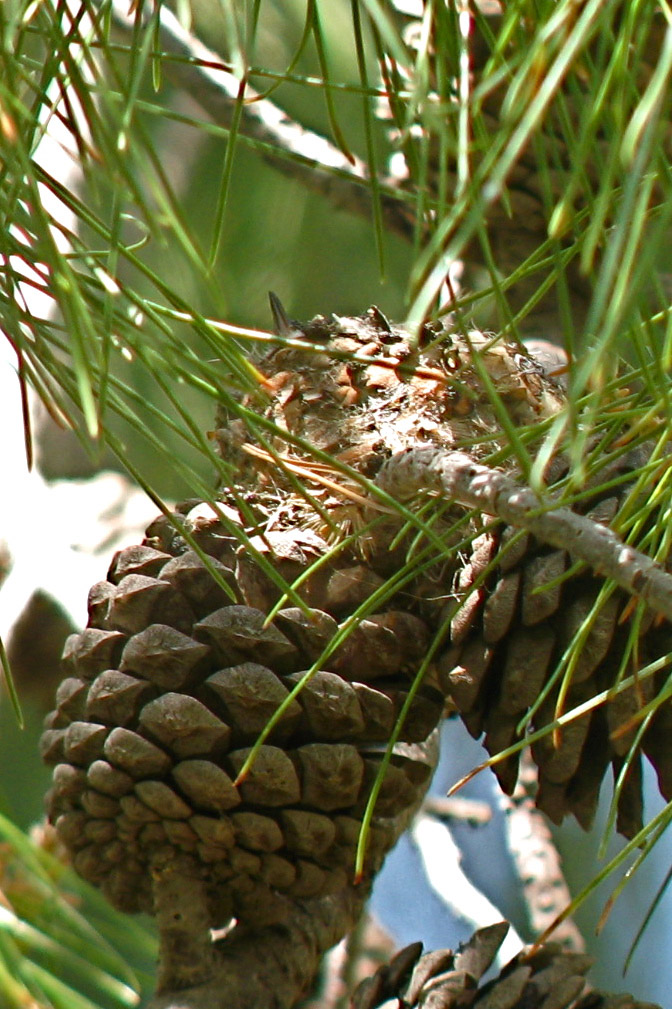
Hen update with photo. The Stalwart Hen and her Nidlings (the Anna’s hummingbird and her nestlings in our backyard pinetree) are still hanging in there, despite a night of unseasonal wind and cool rain.  In this photo, the bottom side of the tip of one of the nidling’s beaks is just visible at the left edge of the nest, above a nearly horizontal pine needle.  From the upper window, I can see two nestlings clearly, but the window screen makes focusing a photo tough from there.  The two Nidlings have grown enough so that they fill the cup of the nest, and their little beaks stick upward over the edge.  Each day the beaks are getting longer and darker, but they’re still nowhere near final hummer-length.  Go Hen Go!

Posted by Allison on Apr 12th 2009 | Filed in birds,close in,increments,natural history,nidification,yard list | Comments (1)

« Prev - Next »